2 May 2011

Site context specific experiments using force fields and empties to generate initial form of concert venue

EXPERIMENT 2

In this experiment emmitter was once again changed to hair/ Amount:50/ Steps: 7/ Render:9. Empties all still spherical but strengths all +20.


This is how it looked in 3D:

Site context specific experiments using force fields and empties to generate initial form of concert venue

EXPERIMENT 1

Based on the aforementioned context of wanting to track and map the forces emitted from existing popular live music venues in the site's macro climate, I applied force fields to the relative positions of these places and experimented with their interaction with the folie on site.

Forces were placed in locations specified in the site analysis study earlier:

Experiment 1 had all empties north of the site to have a strength value of -20, and all empties south of the site to be positive 20. This is what hairs were produced from spherical empties.

28 April 2011

DAB 510 - Architectural Design 5: Experiments on Site

DAB 510 - Architectural Design 5: Experiments on Site: "I CONDUCTED SOME EXPERIMENTS TO TRY AND CREATE FORCEFIELDS IN THE SITE CORRELATING TO ELEMETS OF THE SITE. THIS FIRST IMAGE IS OF TRAFFIC O..."

Just testing how to blog a terrific post from Cec's page onto mine using the Blogger icon next to comments on her page.

Exploring Blender's Modelling Features

I wanted to test out what modeling features blender had available today and simple aspects of it's interface. Here are some of the experiments:

META MESHES
Spacebar/ Add/ Meta Meshes... they morph into one another or can act as individual identities.


VIEWS
Bounding Box


Shading


Solid


Wireframe


SHADING/MATERIALS
Colour application to object: Red


Sphere application to object: Green (basically the reflective areas are tinted green where light hits the surface)

Concept development for DAB510

I've drawn a lot of inspiration from the below images as I believe they are a lovely solution to the core aspect that my design is going to give the Brisbane community... basically the feeling, sound, taste, smell and feel of peace at a point in the city where opposing forces meet. Flood could meet tsunami. Work ends and leisure starts literally for many inner city workers and students. Culturally the site has lived through WW2,ancient Aboriginal secrets, and ceremonies and where the land meets the river. And so when people settle down here I am really wanting it to be because it is a place they like regardless of what stage of life they are in. All can come in, chill out and rest.

Source: The Cool Hunter's Facebook page sourced on 27.04.11 (Restaurant near Sanyou Cave above the Chang Jiang river, Hubei, China


I am particularly drawn by this walkway interface. I could maybe look at how the water splats up against the cliff and use a similar concept with my outdoor space provision... food for thought...

Source: The Cool Hunter's Facebook page sourced on 27.04.11 (Town of Kotor in Montenegro)

Collision

This simulation used different settings under collision. So to get there you choose Object/ Physics/ Collision. I am still very interested in what shapes can be possible from that accidental point at the centre of the three forces (tsunami, flood, folie).


There was far too much water in this example, but hopefully I can work on getting more control over this in class tomorrow.

Once again I am having issues with my lighting in certain views also.

Too many lights in the rendered scene to see clearly

As I was struggling to see the folie clearly in my animations due to the shadow caste by the bridge, I tried to increase the lighting (SHIFT+D duplicate).


3 lights were too bright as shown below; particularly next to the folie.


I was having problems uploading these brightly lit scenes to youtube, so here is a print screen when I had it open in Windows Movie Maker (the converter program) and you can clearly see the left side is far too light.

Domain too large and water runs down an imaginery wall

Now it was time to apply a domain with gravity alterations to get that side push of fluid in the simulation. I made a cube and attributed it the domain with Bn: Surface Sub 2, Smoothing 1.5/ Ad: Gravity x=-7.8, z= -9.81 and BAKE


I noticed with this horizontal push that it was essentially running off the model and sliding down an invisible wall to the side that was too big. So I changed my domain size to fit more proportionally with the rest of the scene.

Resolving how to reshape a mesh

I then remembered to type in N (Properties)/ and increase the z scale (but not linking the scale) to lengthen my object.

Reshaping mesh

So I started to adjust the cylinder water source settings. Moved it closer, and changed the size of the sources for the next animation but was having issues manipulating the cylinder shape to what I wanted.

I put it into Edit mode/E / Vertices... and pulled. But to no avail...

Water spilling off the plane

I noticed in this animation that the water kept falling off the edge of the plane prematurely.

Forgetting to acknowledge and assign all physics elements when simulating a fluid animation

It was now time to apply these methods practised in class to my design process, in order to come up with a building form and and spatial arrangement that was a direct result of experiments.

Based on the previously posted concept of being interested in the point where the two external water forces meet and interact with the site, I set up two cylinders in the model and set them to fluid. I accidentally chose only part of the site as an obstacle, and so this entirely wiped out the rest of the site when I baked it. This is interesting as you really need to watch what you're doing.


I also didn't apply any extra variables to this simulation as wanted to see how the water would naturally react to the base plane.

25 April 2011

Further Micro Environment Analysis

Another relevant thing to assess on the site is the possible water pressures that may fluidly interact with the site and what direction they would come from. Based on the data gathered within our class group's research, I have calculated the relevant water height RL's relevant to the site's topography:


I will now simulate these fluid forces in blender to see how they interact with the folie on site and possibly freeze the frames to see if a new shape has emerged from the interaction of the forces. I will mostly experiment with form, direct response to the micro environment, and interesting sensory experiences that may result.

Relating these new techniques to our site's micro environment

After experimenting with these techniques in class, I wanted to relook at my site for Howard Smith Wharves and map out some relevant forces that relate to my folie's concept of an outdoor music venue.

I will now conduct several experiments with force fields placed at the red dot locations to possibly determine aspects of my design such as circulation, zoning of activities, space distribution and schedule of areas.

Here is a map of the site's relationship with major existing gig venues in the surrounding areas:

These are the lines of force and traffic flow linking the existing Brisbane scene to the site:

...and the resulting points of interest to be explored as empty points for a blender simulation:

Creating skin and hair particle paths using empties and force fields

Create empties in the scene now to influence particle flow much like a magnet attracts magnetic objects. Be in top view and Add/Mesh/Empty. Object icon/Physics icon, choose Fields: Spherical/ Strength= -21.0.

NOTE: the +/- of strength determines whether the particles will be drawn (-value) towards the empty or repelled in the opposite direction (+ value).

To create hair from our particle pathways that have been formed through interaction with the empty field force points, we go to Object/ Particle Buttons/ Particle System/ Hair (10 not 4000)/ Visualisation Steps:7, Render: 9, BSPLINE/ Edit/ Modifier/Convert and move another beside it so we can see the difference of before and after when I apply the skin effect.
The object on the left has had Faces (F)/ Skin Faces/ Loop/ TAB… and here you go:


Here is another example of this technique I did in our class tutorial:

Emitting particles from vertices

To have a decent amount of footage, I increased the Particle System end to 250/ life 250/ and changed the END FRAME to 100 in the drop down Animation bar. Then I changed back to 2.Model/ and chose the emit particles from: Emit From/Random Verts


NOTE: if having issues with ANIMATING the camera view, make sure the camera frame is selected and not the object you have been editing… something I worked out

Less particles

When I changed the amount of particles shooting from each face from 1000 to 20, here was the effect.

Particles shooting outwards

To have the particles shooting out, I changed the normal value to 5 under initial velocity.

Particle systems on planes of a cube

Next we looked at creating particle systems, specifically creating a particle on a plane and then creating a series of empties with force fields applied to them. These forces with different strengths on each empty to affect the flow of particles and see how this would play out. Florian the tutor, experimented with this in his architecture thesis and criss-crossed his particles paths to overlap and creating bracing system for the building. This is the same sort of theory that the reading on the Migrating coastlines: Residential Tower, Dubai discusses they used in their building. For more information, see literature summary in an earlier blog post.
Firstly I made a cube then selected object/particle/add new/ALT A.


I am noticing that it is really blurry so will try to reduce the number of particles in my experiments today and see if that reduces the glare.

Reducing compression settings of renders to significantly reduce upload time

I am very pleased to say that with a few tips from class mates, I have been able to completely remedy the issue I was having with huge upload times due to my enormous file sizes. The steps I went through are as follows:

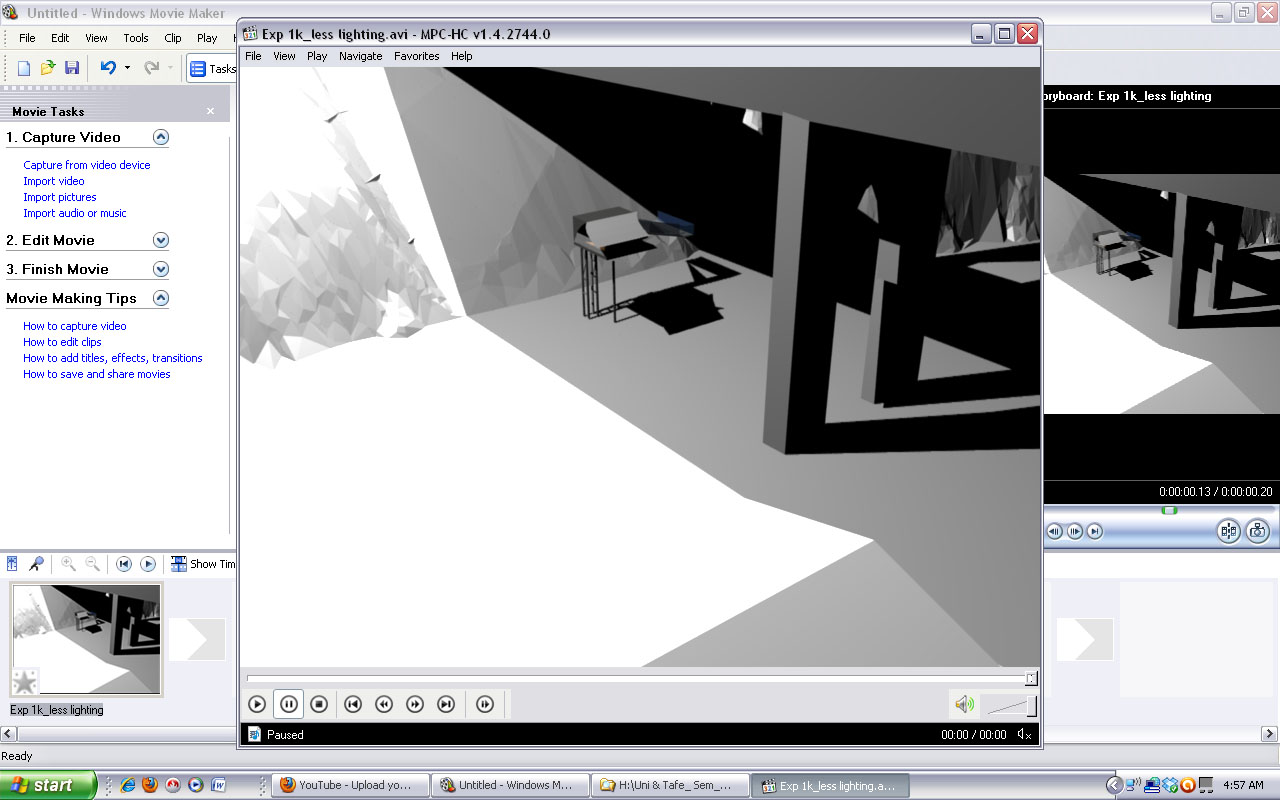
1. Import blender avi animation file into Windows Media Maker.
2. Drag the file into the bottom left screen shot panel/ File/ Save movie file/ My computer/ wmv..../Finish

This reduced my previous tsunami post from 82000 KB to 4.97KB! Which meant when I then uploaded it to youtube, it took 3 seconds as opposed to 45 minutes! Needless to say I am very pleased with this new knowledge...

3. Youtube/ upload file as normal and save.
4. Copy the Youtube URL (public page/ share/ embed/ copy URL) and paste this into your blog entry for a direct link to the video.


In this animation, class member Ian taught us how to transform the water from Ben's tsunami experiment into sparkles using the Halo Effect. First delete the cylinder then select the water/ shading/ add new/ material/ render pipeline: Halo/ Shader: rings, lines, stars.